Better Biscuits

I'm munching on a unique biscuit in between typing sentences - a wholegrain biscuit that is actually light and fluffy! I've tried subbing whole grain flour for all-purpose in my basic recipe before but have always been disappointed with the heavier texture and slightly bitter flavor. I solved the flavor problem by getting a grain mill and using fresh-ground flour instead of stale store-bought, but the texture was still an issue. Until today!

I decided to take Gnowfglin's Sourdough Ecourse and so I have just begun using my sourdough starter. Today I had increased my starter more than I ended up using for pancakes, so on a whim I decided to try biscuits. I had a recipe on my harddrive that I adapted a bit, and here are the results -


Quite light for a whole grain biscuit, I'm very pleased. You can see by the color they are whole grain, and the flavor is as robust. I used a blend of half and half hard and soft white wheat. I don't care for the stronger flavor of the more common red hard wheat. I sometimes use spelt as it is a milder, nutty flavor that I really like. I baked these in a cast iron skillet that I placed in the oven before preheating it. I baked them at 475F, a very hot oven, because I've found that with quick breads, a higher temp gives a better oven spring so the final product rises higher & fluffier. Yum!

I am so excited that finally I have a successful sourdough starter going, and that I have a way to make biscuits with my fresh whole grain flour that doesn't result in hockey pucks!!

Bean Bag Bonanza


Somehow, back at the beginning of the school year, I received the assignment to create a classroom's worth of beanbags for my son's Waldorf school. I guess cuz I admitted to owning a sewing machine? Oh well. Down to business, very... repetitive... business.

Step One: a)Buy fabric on sale for half price at JoAnne's which results in b) end up paying more for thread than for the fabric.

Step Two: Cut, cut, cut. Thank goodness for my rotary cutter. I promised it a new blade after this is done.

Step Three: Sew, and sew, and sew....

Step Four: Lentils!! Yep, the preferred filling for Waldorf beanbags is the humble lentil. Hm, makes me glad cooler weather is here so I can enjoy a big pot of lentils and ham hocks cooked in bone broth, with a side of gluten-free rosemary ciabatta slathered in pasture butter, while wearing corduroy... wait, scratch that last part.

Can you believe, I delivered the beanbags to the school, in an appropriate willow basket, and forgot to take a picture of them? All I have left are these three, which will go to my teen as a gift so that he can keep up on his juggling skills.

Elderberry Lemonade for a Summer Cold


For a summer cold, steamy hot cups of herbal teas just won't do. Spend the day sipping on this cool concoction full of vitamin C and elderberry, instead.

Elderberry Lemonade

1/4 c. dried elderberries
2 c. water

juice of two lemons
sweetener to taste
crushed ice
10 oz cold water

Make the elderberry decocotion: combine the 2 of water with the elderberries and bring to a boil, lower to a simmer for 30 minutes. Strain out the berries and set aside.

Into a 16oz glass, put the lemon juice and 1/4 c. of the elderberry decoction. Add 10oz of cold water and sweeten to taste, then add crushed ice. Sip throughout the day.

Sprouted Wheat Salad


A nice cool salad for a hot July day, this dish is excellent for potlucks. With sprouted grain for a nutrient upgrade, this is a dish that is richly flavorful, hearty and nourishing without seeming too heavy for summer.


Prepare the wheat berries:

2c. organic wheat berries

1tbs vinegar

6c. water

Place wheat in a large bowl with the vinegar and water, let soak overnight or longer. Rinse twice a day (put a splatter screen on top of the bowl and simply invert it over the sink, then refill). When you can see tiny little sprouts just starting to emerge from the grain, it is ready.

To cook, drain and give the wheat a final rinse. Cook as you would pasta, in a pot of water. Test for doneness and remove from heat before the grains burst open. Drain in a colander and rinse with cool water. Set aside to cool and prepare the rest of the ingredients. Wheat can also be separated into portions and frozen at this point for future use, or dehydrated and ground for sprouted flour.

Dressing:

2c. fresh basil leaves

½ c. your favorite basic olive oil & vinegar dressing (see Favorite Vinaigrette)

¼ c. minced fresh chives

¼ c. finely grated parmesan

2c. cherry tomatoes, halved

1 ripe avocado

In a blender, process half the dressing and all of basil leaves til smooth. Pour over the cooked cooled wheat , add remaining dressing, chives, parmesan and tomatoes to the bowl and mix. Refrigerate for 2hrs to blend flavors, taste and adjust seasonings as desired. Before serving, dice the avocado and sprinkle over the salad.

Optional: Add ½ c. of chopped pistachios, pine nuts or almonds just before serving

©2010 Mom's Neverending List

Nourishing Graham Crackers


Graham crackers are a childhood staple - but the ones in the blue box I loved as a kid are full of stuff I don't want my own kids eating! (well, except for those s'mores on our last camping trip, hehe.) I sought out healthier versions at the natural foods stores, but ouch - so expensive, and they didn't really taste the way we wanted a graham cracker to taste. So I came up with this recipe, adapted from one I found on the net. I converted it by subbing in wholesome ingredients and applied the soaking technique common to Traditional Foods grain preparation. It's easy to do, the dough is mixed one day and the baking done the next, or whenever you have time.

Nourishing Graham Crackers

2c. whole grain flour, approx. ½ to 1/3 of it soft wheat aka pastry flour

½ c. pasture butter, or a combination of butter & coconut oil

½ - ¾ c. rapadura

1tsp. vanilla

1 ½ tsp baking powder

¼ tsp sea salt

¼ c. yogurt, mixed with 1/8 c. milk or filtered water

Cream together the butter & rapadura. Stir in vanilla. Mix the dry ingredients and stir in, alternating with yogurt. If needed you can add a bit more flour. The dough should come together in a slightly sticky ball. Cover and let sit overnight.

Chill the dough to cool it. If necessary you can keep it in the fridge a day or two. If you want to keep it longer, freeze it, and thaw before baking.

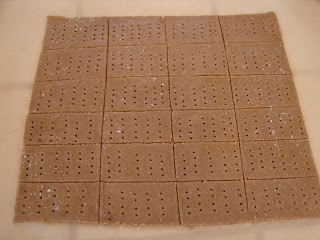
When ready to bake, preheat the oven to 350F. Divide the dough into three portions. Roll out to a 1/8’ thickness on parchment paper, all the way to the edges, trimming off the ragged edges and adding them to the next portion. Slide the parchment onto a cookie sheet and with a knife, score the dough into square or rectangle shapes. Poke holes all over with a fork... seven year olds are great at this task...


and bake about 10 - 12 min. til lightly golden on the edges. Repeat for the remaining dough. I usually get about four 1’x1’ squares of dough after rolling each one out on its own parchment, including using up the scraps trimmed off to make straight edges.


As soon as one sheet of crackers comes out of the oven, slide on another and continue baking. Cool baked crackers on a wire rack.

If the crackers are not completely crisp, then after the last batch comes out of the oven, put all the cooked crackers back onto the baking sheets and place them in the hot oven. Turn off the heat at that point, and let the crackers sit in the oven until they are cool.

Crackers that won’t be eaten within a couple of days will keep perfectly for a very long time in a quart size canning jar, with an oxygen absorber packet and the lid on tight.

Win a Bosch Mixer!

Since my old Black & Decker food processor just bit the dust, I'm scoping out applicances - and found that Deals To Meals is having a giveaway this month for a Bosh mixer. Do I need to list the reasons you'd want a Bosch? I didn't think so!

If you aren't familiar with Deals To Meals, they are a really cool site that does comparisons of grocery prices for you, so you can get the best prices as you work on your monthly grocery list or your food storage needs. Members have access to the information about all the deals and sales in their area that are better than Sam's Club or Costco prices. They also have meal plans to help you stay organized and use your food storage so you can be sure to "store what you eat, eat what you store".

To enter, just put their button on your blog or post an entry on your blog about them... if you have no blog, there are other ways too... follow the instructions given in their giveaway post.

Click here to see giveaway & enter!

Good For You: Soda

On my list of things that are good for you, soda doesn't usually make an appearance. But thanks to a recent post at A Moderate Life, it's going to appear on my healthy list a lot more around our house. No, I haven't become convinced that HFCS is suddenly wonderful. She shared a simple easy recipe for creating soda out of fruit juice - and not only does it work, it tastes great.

I know, you think maybe my taste buds must be a whole lot different than yours if I'm saying this tastes good... The one thing no one ever describes adequately about fermented foods is "What does it taste like?" I'll tell you: This soda tastes like whatever juice you make it from. None of the ingredients change the juice's flavor, so don't worry about that. The kids will like it, heck, my husband even liked it. I'm sipping on my orange-tangerine soda right now, and the closest thing I can compare it to (besides just the juice..) is a mimosa! The gentle carbonation adds a sophistication to this beverage; it really would be perfect to serve to company. This will be my choice for summer instead of the hot/iced tea I normally serve. It's soda, grown up.

I followed the proportions of the recipe but not the type of citrus. Here's my version:

8 organic oranges
6 organic tangerines
1c. granulated sugar
1 c. whey (drained from plain yogurt)
1 generous T zest from one of the tangerines

Juice the citrus. I threw the zest into the juicer too. Add sugar to the juice, stir to dissolve, add the whey & mix. Using a funnel, pour into two 32oz. bottles with wire-bail closures. Allow to sit at room temperature 48 hours. If no fizz has developed by this point, open the bottles and add more whey, I had to do this and I didn't measure the whey, just added til the liquid in the bottle rose almost a quarter inch. Rock the bottle gently to mix, let sit again.

When it's working, you'll see a layer of foam start to build at the top and it will get thicker as it sits. Refrigerate the bottles when the soda tastes right to you. Definitely open it in the sink; there could be a celebratory fountain of soda when you pop the seal.

This post is linked to Gnowflin's "Probiotics at Every Meal" series - check it out!


Eat your probiotics!

Used to be, moms would admonish their delightful offspring to "Eat your vegetables!" and while that still stands, I encourage you to take it up a notch and switch to "Eat your probiotics!"

No, I wouldn't really say that to my teenager (the little ones, however, are used to it), but incorporating living probiotic food into your life is a great way to help the family stay healthy. The easiest food to do this with, I think, is dill pickles. They are the most widely accepted and thus a good first choice when you begin to choose probiotic foods for your family.

The dill pickles found at a grocery store aren't what we are talking about here - those are soured by modern methods using vinegar, then canned at high heat - they have no live probiotics in them. Originally, in our great-grandmothers' day, pickles were never done that way - they were fermented. This is the secret of developing not only the live, healthy bacteria we desire, but that delicious sour flavor. Fortunately, making our own real, old fashioned dill pickles at home is very easy and low tech. Here's my recipe.


Real Dill Pickles

Start with the freshest cucumbers you can get. If you can grow them in a container or in your garden, great. If not that's ok, you can buy some - first choice is organic baby cucumbers (in my area, Costco carries them), if you can't get those just use the slicers at the grocery store. One pound of small cucumbers will make two quart jars full of spears, or one half gallon jar.

Ingredients:
1lb cucumbers
2qts. filtered water (not tap water)
6tbs sea salt
6 large cloves of fresh garlic
2 sprigs of fresh strawberry leaves (can use fresh grape leaves too) this is a required ingredient, it keeps your pickles crisp.
2 handfuls fresh dill

Make the Brine:
Mix two quarts of water in a container with six tablespoons of sea salt til dissolved.

Prepare the Cukes:
*Rinse the cucumbers well, then cut the ends off.
*Slice into spears
*place spears, leaves, garlic and dill into two quart-size canning jars or one half gallon jar
*Fill the jar with brine up to one inch from the top

Place a small jar or glass (half pint widemouth canning jars work perfectly in larger widemouth jars) into the larger jar. This will weigh the contents down and keep them under the brine so that no mold can grow. In the photo below I have used two half pint jars in two half gallon jars.


Put the pickle jars in a cool dark place like your pantry cupboard. I set them into a tray to catch the overflow that can happen when fermentation gets active. Leave them for four to six days. Before they are fully fermented, they may not taste that great so don't judge them til they are "done". Note that "slicer" cucumbers will be softer in the middle - I often scrape out the soft seedy portion while I am slicing them up, because I find that part always gets soft.

As the fermentation begins, you will see bubbles start to rise to the top. At the surface of the brine, a white foam will develop - this is good and normal. Make sure no cucumbers or anything else rises above the surface. I start tasting around day four or five depending on how warm it is in the house. When they taste like dill pickles, remove the small jar, put a lid on the quart jar and store your pickles in the fridge. They will keep for months, but usually don't last that long!

Cheap & Delicious Eats: Pinto Beans (yes, really)


Yesterday I found two big bags of pinto beans on sale for two bucks each. Not organic, which I would rather, but at that price - I won't complain. Here is how you make those cheap old pintos taste like a gourmet meal.


Don't be intimidated by the idea of preparing dry beans, it's so easy my seven year old can do it. It takes very little time, most of the time the beans are doing their own thing while you go about your business. The way I am going to show you, the beans come out so tender, creamy and mild that they are good all by themselves with a pat of real butter and a sprinkle of sea salt. I've never liked plain beans but after I learned to do it this way, I was really surprised how enjoyable they can be. I cook beans plain to store in the freezer, it makes chili or ham & bean soup or just simple beans & rice, a quick and easy meal to whip up on a busy night. The kids also like them as finger food to snack on during the day. Sort of like edamame, only cheaper, and much more digestable!


  • place beans in a large bowl, sort out any broken bits or pebbles. Rinse beans & add salted water to cover the beans by about an inch. (two teaspoons of water for each quart of water) Cover the bowl. Ignore them til the next day.
  • in the morning, pour off the water & refill the bowl. Repeat in the evening, this time don't add any more water but leave the wet beans in the covered bowl.
  • in the morning, place the beans in a colander and rinse them well. By this time they should be sprouting; you will see a little tail emerging if you look closely. Don't worry if the soak water doesn't smell that great, it will all get washed away in the final rinse.
place the beans in the cooking vessel. I prefer a dutch oven, or crock pot. Add water to just cover the beans. Heat on high til it just begins to simmer then reduce to the lowest heat. Because of the long soaking & sprouting, they will not take as long to cook. Do not stir them while they cook, if you want them to remain whole. Cooking time will vary but roughly an hour and a half should do the trick - test & remove from the heat as soon as the beans are tender.

I drain the cooked beans in a colander & let them cool then divide into portions and freeze.

Use this same technique on any other dry bean for the same creamy, tender results.

Three Non- TV Ways to Occupy Your Delightful Offspring

I'ts a rainy or subzero day. You just need fifteen minutes in the kitchen, on the computer, or if it's a really bad day, in the closet. But every time you step out of the room all heck breaks loose. Ok, here's a few ways to get fifteen minutes of less chaos. Not no chaos cuz that, my friend, is not possible.


#1 - Humongous Playdough
Some kids are happy with playdough anytime, but if your kids are bored with those little cans of dough, do something a little different. It will take a few minutes but provide about a year's worth of play. Make a playdough recipe and let them play with the entire thing in one big, squishy ball. I find that letting the younger ones sit at a highchair with the dough on the tray is helpful in controlling any mess. For older kids, I use a black lawn bag, unfolded onto the table. Spritz the table with water or run a very damp cloth over it before laying the bag down, and the bag won't slide off the table.

#2 - BubbleMania
Lay a large blanket or sheet out on the floor. Make a big sinkful of bubbles with dishsoap, and give the kids the biggest bowl you have, full of bubbles. Make sure they have plenty of spoons, cups, whisks etc. I have had great results with this for kids from ages 2 up to 7. If the kids are able, you might also let them blow bubbles with bubble solution in the blanket zone.

#3 Indoor "Pool"
Do you have one of those kids who will spend 45 minutes in the tub playing & never get a single hair wet? At 6:30 pm this is a highly stressful trait. Any other time, this is an ace up your sleeve. Use it to your advantage, then, and let your little one put on a swimsuit, take out a beach towel (or a whole bunch of beach towels, depending on your kid's play style) and fill the tub with toys. I leave the bathroom door open so I can monitor my seven year old while he's in there creating tidal waves & whirlpools. I learned when I left a squeegee in the tub once that he will scrub the walls and shower door as part of his play! (hey, it's worth a try) Assume there will be water flying, and lay out old towels so you don't have a mopping job afterward.

Three Things You Should Know This Flu Season

This year, a new vaccine is going to come out & will be targeted at school children as a protection from the dreaded Swine Flu. Here is some information you can use to make the choices you will be faced with in a few months.

  • according to Australian Federal Health Minister Nicola Roxon, the swine flu is a mild flu similar to regular seasonal flu. "Most people, including children, will experience very mild symptoms and recover without any medical intervention," she told the ABC News on July 2, 2009.
  • The new vaccine has been developed under regulations that allow it to be released without the same testing as other vaccines, because the WHO (World Health Organization) declared a pandemic. There has been and will be no safety testing - this vaccine was developed, manufactured and shipped in a matter of weeks.
  • Although school children will be among the first to be targeted by the vaccination program, you should know that it is not mandatory for your child to get the injection to attend school. It is usually a simple matter to sign the exemption form - in some states, it's just a line on the back of the sheet they use to document each child's vax history.

So why would you want to consider declining a vaccine during a pandemic? The definition of pandemic isn't, "Panic, it's an epidemic!!" although it really does sound like the words "panic" and "epidemic" are mixed in this misunderstood term. All it means is that a new virus is moving across the globe. That basically happens every year when the new year's mutated version of the regular flu arrives. It does not mean that millions of people are going to die. The WHO actually classifies the H1N1 virus as a moderate illness that requires neither hospitalization or even medical care.

Another aspect of this situation is that the new vaccine contains squalene as an adjuvant. Squalene is normally used by the body after ingestion in foods like olive oil. However, when it is injected, the immune system generates antibodies to it as if it were an enemy. Then it attacks all the squalene molecules present in the body even where squalene is supposed to be, in your nervous system. This has in the past resulted in auto-immune reactions with serious consequences.

In a nation where the country's budget is in the red, how does it make sense that over a billion dollars are being spend on ingredients to manufacture a vaccine for a virus with mild symptoms? And now that it is clear that the virus isn't significantly different than the regular flu, why is there an urgent plan to administer the vaccine at schools as if it were polio or smallpox?

Who stands to benefit the most from this plan? It sure isn't you or your kids.


The Case Against Coupons - Sort Of


Lately there have been a few stories on the news and online about women who have figured out how to use coupons so efficiently that they can obtain a cart full of groceries for just a few dollars. There are websites that tell you how to be a master coupon -clipper/sorter/spender. I love a good coupon as much as the next person - don't get me wrong, the feeling of getting a good deal thrills me to no end! However, when it comes to using coupons for food, the definition of "a good deal" is the problem. Here's my list of reasons why.

  • The lady featured on the news for her coupon-fu opened up her pantry to show off her loot... and there were rows and stacks of boxes. What a letdown! I was hoping she'd figured out a way to obtain coupons for something we eat, but... Ninety percent of coupons are for processed, packaged pseudo-foods. Rarely do you find coupons for the foods in the store that are unprocessed, whole and wholesome. Just because you get a box of processed junk for practically free doesn't make it a good or even ok food.
  • The real cost of processed foods has nothing to do with their price. The cost of eating food that doesn't support health is the risk of loss of your quality of life through disease and expensive health care bills later on. Of course, since this may come years down the road, it's easy to discount this as a true cost in favor of the illusion of saving a few dollars today. I'm not saying never indulge or treat yourself to a night off in the kitchen - just be honest with yourself about what it is you are (and aren't) getting for your hard-earned money.
  • The time you spent finding, clipping, printing, organizing and otherwise managing your coupons could have been spent preparing ingredients bought in bulk, to create foods that are far cheaper and infinitely healthier per serving than the foods you would have purchased with the coupons. It's common to believe one does not have time to eat whole foods since they do require some preparation, but here is one instance where a non-productive activity can be replaced by one that saves time, money and health.

On The Other Hand...

Coupons can save considerable money in certain specific areas - household non-food items and organic products.

For non-food items, especially in cases where you prefer one product over another, i.e. a brand name over a store brand, coupons can make a big difference. If you have the opportunity, combine coupons with store offers and save twice on the same item! CVS has a program that offers rewards as well, so while purchasing an item with a coupon and a store discount, you might also get "bucks" back that you can use to make a future purchase. If you use the same method for the future purchase - coupon + store offer+ bucks back + pay with previously earned bucks - you might even end up with a negative balance! If you have a CVS in your area and aren't already taking advantage of this system, check out this thread about How to Be a CVS'er.

The other situation where coupons can be helpful is in buying certain organic products. Of course there is as much junk food in the organic aisle as the rest of the store so don't be fooled, stick with the whole foods rule so as not to waste your money on even higher-priced organic junk! One category I like to stay organic in is fats - since the fat of animals especially can accumulate toxins - so when I can, I use coupons to help with the cost. Organic Valley is one company that is very good about providing coupons to customers. I've gotten their coupons three ways - from the website, from our store having an OV rep come and be part of a "food fair", and from coupon booklets given out at the local natural foods store. If you sign up for the OV newsletter, each time you get one from them you should be able to go to the site and print out coupons.

If you have a certain brand you like, go to their site and see if they offer coupons or an opportunity to sign up for a newsletter that will notify you of sales and special offers.

The other place I do use coupons for non-food items is at Costco. I have never seen them offer a coupon for a food that is actually healthy, so I don't bother with their food coupons. Costco will not accept any manufacturer's coupons, only their own. However, for bigger ticket items, there are definitely deals to be had. To make Costco even more worthwhile, you might want to think about upgrading your membership to the Executive level. That means you would earn 2% back on purchases yearly, so if you spend as much as we do there, the rebate you earn will be enough to pay for the membership fee and possibly more.

So when considering coupons, be critical and consider the real price - a good deal on something that is going to cost you later another way isn't a good deal at all. Real foods rarely ever have coupons, so don't spend time finding, collecting and organizing them when you could spend that time buying real food and preparing it instead.